Settings · Documents
The Documents section is where you set up everything that controls how your invoices, receipts and other documents are numbered, branded and transmitted. It groups five separate jobs onto one screen: your physical branches (establishments), the numbering series for each document type, the visual template applied to every invoice, your card-payment terminals, and the inbox connection that pulls documents your suppliers have issued to you. Get these right once and every document you raise afterwards inherits them.
Where it is
Top navigation → Finance → Settings tab → Documents (in the row of settings sub-tabs).
What's on the screen
Five stacked blocks, top to bottom:
- Establishments — your registered branches, each with the establishment (branch) number used when transmitting to myDATA.
- Document Types & Series — the numbering series defined per document type and assigned to a branch.
- Invoice design template — the visual template ("Classic") plus seven brand colour pickers that style every invoice.
- EFT-POS Terminals — the card-payment terminals registered for card receipts.
- myDATA Inbox (Received Documents) — the credentials that let the platform pull documents your suppliers issued to you.
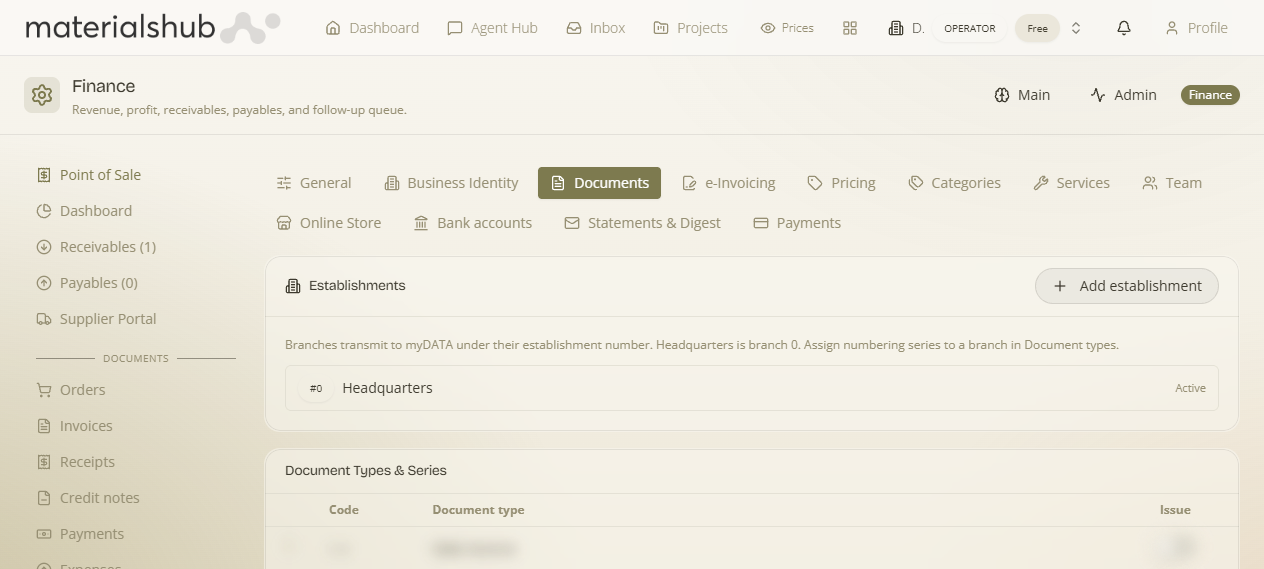
Establishments
An establishment is a physical place of business — a branch. It matters because branches transmit to myDATA under their establishment number, so myDATA can tell which location issued a document. Your headquarters is always branch 0; additional shops, warehouses or showrooms are branches 1, 2, 3 and so on. Once a branch exists you assign a numbering series to it over in Document Types & Series.
How to add an establishment — step by step
- Go to Finance → Settings → Documents.
- In the Establishments block, click Add establishment. A dialog opens.
- Fill in the fields (see the table below).
- Leave the Active toggle on so the branch can be used on documents.
- Click Save. (Or Cancel to discard.) The new branch appears in the Establishments list, ready to be assigned a numbering series.
| Field | What to enter |
|---|---|
| Branch number | The establishment number that myDATA will recognise. Defaults to 1 for your first added branch (HQ is branch 0). |
| Name | A label to recognise the branch by, e.g. "Store — Athens". |
| Street | The branch's street name. |
| Number | The street number. |
| Postal code | The branch's postal code. |
| City | The branch's city. |
| Active | Toggle. On = the branch can be selected on documents. |
Document Types & Series
This block is where you define a numbering series per document type — for example a series for invoices, another for receipts — and assign each series to a branch. This is what produces the running document numbers (and, paired with the establishment number, tells myDATA which branch issued each document). Set up the series you need before you start issuing documents so numbering is consistent from the first one.
Invoice design template
This block controls how every invoice looks. The template is "Classic" — described as "Centered wordmark, thin hairline rules, monochrome." You don't change the layout, but you do brand it with your own colours through seven pickers.
| Colour picker | What it sets |
|---|---|
| Accent | The highlight colour used for accents on the document. |
| Header background | The background of the invoice header band. |
| Header text | The text colour inside the header. |
| Table header | The colour of the line-items table header row. |
| Text | The main body text colour. |
| Secondary text | The colour for less-prominent supporting text. |
| Lines / borders | The colour of the hairline rules and borders. |
How to brand the invoice — step by step
- In the Invoice design template block, confirm the template shows Classic.
- Click each of the seven Colors pickers (Accent, Header background, Header text, Table header, Text, Secondary text, Lines / borders) and choose the colour you want.
- Click Save template to apply your colours to every invoice going forward.
- Changed your mind? Click Reset to defaults to put the original monochrome scheme back, then Save again if you want to keep the reset.
EFT-POS Terminals
This block lists the card-payment terminals registered to your business. Until you add one it reads "No terminals registered. Card receipts will transmit without a terminal signature until one is added." — meaning card receipts still go out, just without a terminal signature attached.
How to add a terminal
- In the EFT-POS Terminals block, click Add terminal.
- Enter the terminal's details and save. Once a terminal is registered, card receipts can transmit with its signature.
myDATA Inbox (Received Documents)
This block connects the platform to your myDATA inbox so it can pull the documents your suppliers issued to you (rather than the ones you issue out). Once the credentials are saved here, the "Sync from myDATA" action can fetch those received documents into the platform.
| Field | What to enter |
|---|---|
| User ID | Your myDATA user id — sent to the API as the aade-user-id header. |
| Subscription Key | Your myDATA subscription key — sent as the Ocp-Apim-Subscription-Key header. Entered as a password (masked). |
- Paste your User ID into the first field.
- Paste your Subscription Key into the second (it's masked like a password).
- Save. The platform can now run Sync from myDATA to pull your received documents.
Worked example — opening a second shop. You open a store in Athens. Go to Documents → Establishments → Add establishment, set Branch number 1, Name "Store — Athens", fill the address, leave Active on, click Save. Then in Document Types & Series create a numbering series for that branch's invoices and assign it to the new establishment. From then on, invoices raised for the Athens store carry their own running numbers and transmit to myDATA under establishment number 1 — while your HQ documents stay on branch 0.
What this section affects
Everything here is foundational, not cosmetic-only:
- Document numbering — establishments and the per-type series determine the running number on, and the branch attribution of, every invoice and receipt you issue.
- Branding on every document — the seven invoice colours apply to all invoices once saved.
- Received documents — the myDATA Inbox credentials power the "Sync from myDATA" pull of supplier-issued documents.
To see these settings in action on the documents you actually raise, head to Finance → Documents.