Point of Sale
Point of Sale is the counter checkout for issuing receipts and invoices on the spot — search for an item, build the sale on a numeric keypad, and finalise the document in one tap. It is part of the Finance suite and reuses the same invoicing, payment and e-invoicing machinery, so everything you ring up here becomes a real financial document. This guide walks every part of the screen — opening a shift, the two views, each keypad key, choosing a document type, issuing to myDATA, and where prices come from — explaining what it is, why it matters, exactly how to use it, and what it changes elsewhere.
How to open it: open Point of Sale at /pos (part of the Finance suite; requires the invoice-issuing capability). Everything you issue here appears in your Finance documents and feeds the rest of the back office automatically.
What this page is for
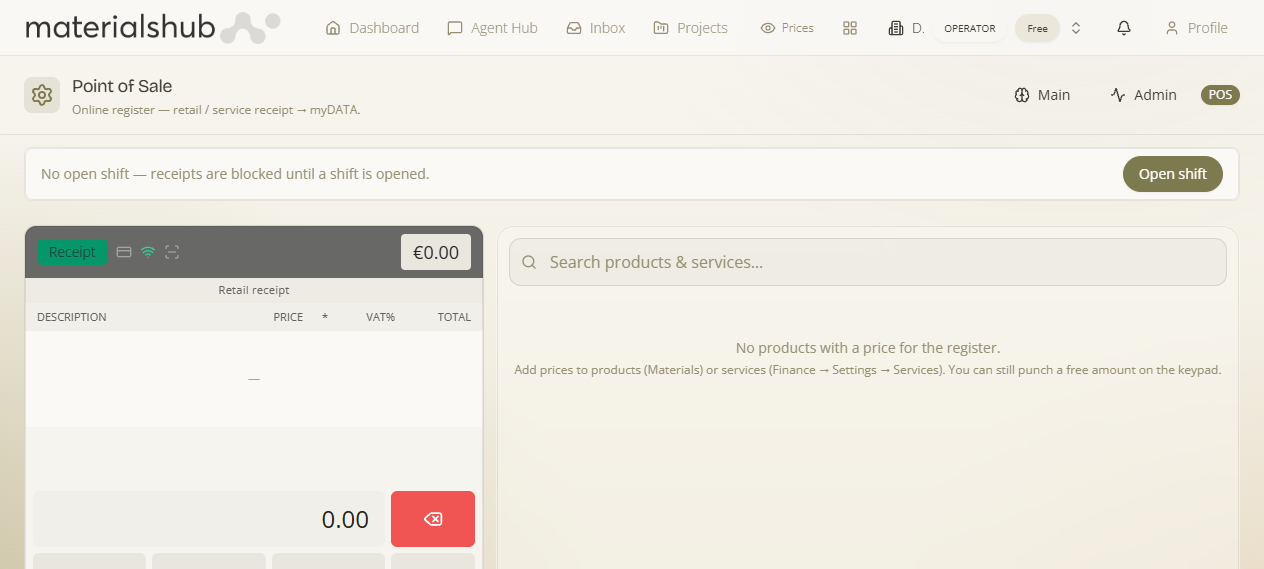
What it is — a fast, in-person checkout. You open a shift, search for products and services, build a basket, set the VAT rate, and press ISSUE to produce the document there and then. It is a single keypad-driven screen with everything a cashier needs, including cash, card and IRIS payments, an on-screen receipt, and printing.
Why it matters — POS sits inside the Finance suite and is gated by the invoice-issuing capability. It is not a separate till that you reconcile later: every sale you complete here is a genuine, numbered financial document the moment you press ISSUE, so the till and your books are always the same thing.
Everything you issue here becomes a real financial document — it appears in your Finance documents and feeds the rest of the back office (revenue, reporting, myDATA) automatically.
Layout & controls
What it is — the screen is split into two panels. On larger screens you see both at once; on a phone you switch between Register and Products using the tabs at the top. Why it matters — knowing where each control lives is what makes a sale a few taps instead of a hunt.
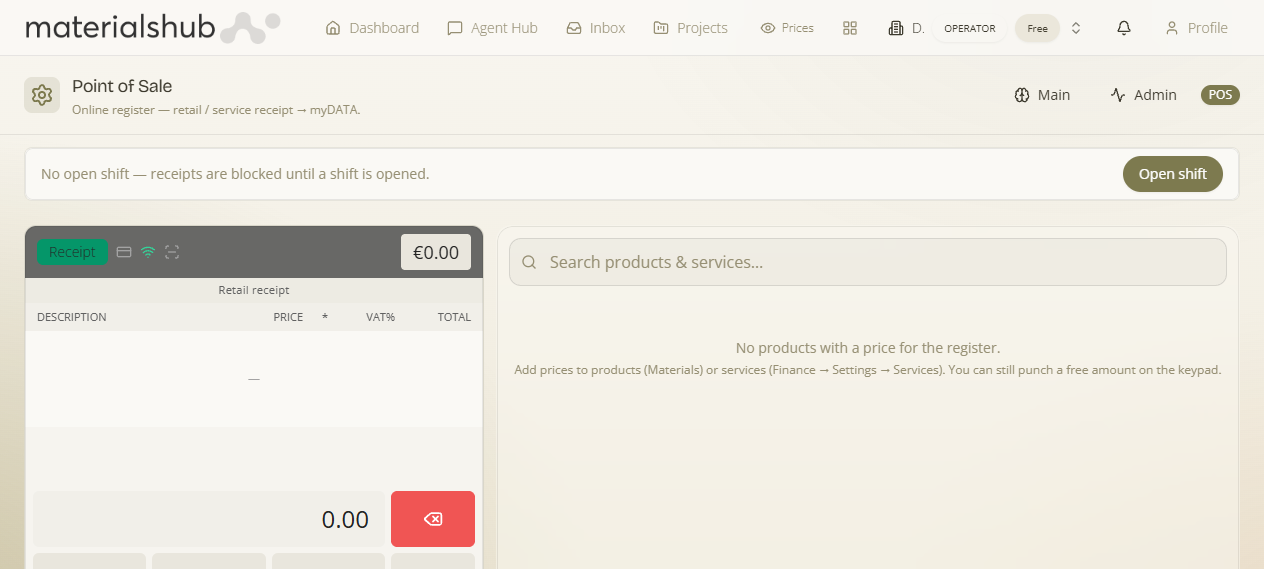
- Shift bar (top) — shows whether a shift is open. When none is open, an Open shift button appears and issuing is blocked. While a shift is open you can record cash in / cash out, view an X report (a live read of the shift so far), and Close (Z) to end the shift.
- Product & service search (right panel) — the “Search products & services…” box filters your priced catalogue. Tap any tile to add it to the sale; each tile shows whether it's a good or a service and its price.
- Transaction list (left panel) — the lines currently in the sale, with per-line quantity (− / +), price, VAT% and total. Each line can be removed.
- Numeric keypad (left panel) — for entering amounts and quantities. Includes a VAT-rate button that cycles through the available rates, a × key to set a quantity, a customer button to attach a buyer, backspace and clear.
- Document type — a button at the top of the register lets you choose what kind of document to issue (for example a retail receipt or a service receipt).
- ISSUE — the large action key. It opens a short confirmation (payment method and a few options), then finalises the sale and produces the document.
Opening a shift
What it is — the act of starting the register for the day. The shift bar at the top shows an Open shift button whenever no shift is running; clicking it asks for the opening cash float (how much money is already in the drawer).
Why it matters — until a shift is open, issuing is blocked — you'll see “No open shift — receipts are blocked until a shift is opened”. A shift is what every sale, every cash movement and every payment is recorded against, so the platform can later tell you exactly what happened during that session and reconcile the cash drawer. Without an open shift there is nothing to attach a receipt to, which is why it has to come first.
How to open a shift
- Open /pos from the Finance suite.
- Click Open shift in the shift bar.
- Enter the opening cash float (the cash already in the drawer) and confirm.
What it affects: it unblocks the ISSUE key, and it seeds the figure that the X report and the closing Z report reconcile against (expected cash = opening float + cash sales + cash in − cash out).
The register in detail
The register is the heart of POS. It has two views and a single keypad that drives the whole sale. Understanding the two views, the document type, and what each keypad key does makes issuing fast and predictable.
Register vs Products
What it is — the screen has two views. On a phone you switch between them with the tabs at the top; on a wider screen you see both side by side. Why it matters — the two views are a build/pick split: one is the receipt you are finalising, the other is the catalogue you pick from. Knowing which is which means you don't lose the basket while you search.
| View | What it's for |
|---|---|
| Register | The keypad and the receipt being built — the running list of lines, the document type, the VAT rate and the ISSUE key. This is where you finalise the sale. |
| Products | The pickable catalogue of priced items. Use the “Search products & services…” box to filter, then tap a tile to drop it onto the receipt in the Register view. |
What it affects: tapping a tile in Products adds a line to the receipt held in Register — the two views share one in-progress sale.
Document type
What it is — a button at the top of the register that chooses what kind of document you're about to issue — for example a Receipt. Why it matters — the chosen type determines how the issued document is classified and how it's reported to the tax authority, so picking the right one is what keeps the document legally correct. How: tap the document-type button and select the type before you press ISSUE.
What it affects: the document's classification, its numbering series, and the way it is described when transmitted to myDATA.
The keypad keys
What it is — every amount, quantity and rate on the receipt is entered through the keypad. Why it matters — each key has a specific job; once you know them, the whole sale is muscle memory.
| Key | What it does |
|---|---|
| 0–9 (digits) | Type a number — an amount, a quantity, or a free-price line. |
| . (decimal) | Adds a decimal point so you can enter cents (for example 12.50). |
| × (multiply) | Sets the quantity — type a number then × to apply it to the item you add next. |
| x (backspace) | Deletes the last digit you typed. |
| VAT-rate key (e.g. 24.00 %) | Cycles through the available VAT rates and applies the selected rate to the lines you add. |
| ISSUE | The large action key — finalises the receipt and produces the document. |
What it affects: the keypad writes directly into the transaction list — quantities, line prices and the VAT% on each line — which in turn drives the totals and VAT analysis on the issued document.
Where prices come from (items only appear if they're priced)
What it is — the Products view only shows items that have a price set for the register. Why it matters — a tile with no price has no amount to ring up, so POS deliberately hides it; if something is missing, it simply hasn't been priced yet. Pricing each item is therefore the prerequisite for it being sellable at the till. How: set the price in the right place for each kind of item:
- Products (goods) — managed in the Products catalogue; their sell price comes from the pricing engine (cost + category markup).
- Services — set their price in Finance → Settings → Services.
- Free amount — even with nothing priced, you can punch a free amount straight on the keypad and issue it as a one-off line.
What it affects: which tiles appear in the Products view and what price they propose on the receipt. The same priced catalogue also feeds the public Online Store.
Once a receipt is issued it transmits to myDATA, just like any other financial document.
Step by step: issue a receipt
A receipt is produced in a few taps. The register requires an open shift first — until one is open you'll see “No open shift — receipts are blocked until a shift is opened”.
- Open /pos from the Finance suite.
- Click Open shift — receipts are blocked until a shift is open (you'll be asked for the opening cash float).
- Search for a product or service and add it to the sale, or punch a free amount on the numeric keypad for a quick one-off line.
- Set the quantity (− / + or the keypad's × key) and the VAT rate using the keypad's VAT-rate button.
- Choose the document type (for example, Receipt) from the button at the top of the register.
- Press ISSUE — the document is produced and, where applicable, transmitted to ΑΑΔΕ / myDATA. It then appears in your Finance documents.
At the end of the day, close the shift (Close / Z) to finalise the register and produce the Z report.
Using the keypad
What it is — the keypad does more than enter quantities; it can override prices and create lines on its own. Why it matters — these shortcuts cover the awkward cases — a one-off discount, a quick free-price sale — without leaving the register.
- Type an amount, then tap a product — the typed amount overrides that product's price for this sale.
- Type a number, then × — sets the quantity for the next item you add.
- Punch a free amount with no product — pressing ISSUE on a typed amount creates a single free-price line, handy for a quick one-off sale.
- VAT-rate button — tap to cycle the VAT rate applied to the lines you add.
What it affects: an override or free-price entry changes the line totals on the receipt only — it does not change the underlying catalogue price in Materials or Services.
Typical flow
What it is — the everyday cashier rhythm from opening the register to handing over the receipt. Why it matters — following the same order keeps cash, VAT and the customer record consistent across every sale of the day.
- Open a shift at the start of the day (you'll be asked for the opening cash float). Receipts can't be issued until a shift is open.
- Search & add items — type in the search box and tap products/services, or punch a free amount on the keypad.
- Adjust quantity and VAT — fine-tune each line with the − / + controls and set the VAT rate.
- (Optional) attach a customer — tap the customer key to link a company or contact to the sale.
- Press ISSUE — choose the payment method (cash, card or IRIS) and confirm. The document is created and, where applicable, transmitted to ΑΑΔΕ / myDATA.
- Print or send — after issuing, you can print a thermal receipt (80 mm or 58 mm) or email it, then start a new sale.
Payments
What it is — at the issue step you pick how the customer is paying. Why it matters — the method decides whether the sale finalises instantly or waits on a terminal, and it determines how the takings are split on the X and Z reports.
| Method | What happens |
|---|---|
| Cash | Recorded against the open shift and the document; finalised immediately. |
| Card | Can be routed to a registered card terminal for a signed payment, then settled and finalised. |
| IRIS | Handled like a signed terminal payment, then settled and finalised. |
What it affects: the payment-method breakdown on the X and Z reports, and the expected-cash figure the drawer is reconciled against at close.
When card or IRIS is settled on a registered terminal, the register may hold the receipt while you charge the device, then confirm to complete it. Cash sales finalise straight away.
Closing the shift (X & Z reports)
What it is — the two shift reports. The X report is a snapshot of the shift while it's still open (receipt count, total sales, a breakdown by payment method and by VAT rate, opening float, cash movements and expected cash). Close (Z) ends the shift: it asks for the counted cash in the drawer and produces the final, numbered Z report, including any cash variance. Why it matters — the X report lets you check yourself mid-day without ending the session, and the Z report is the formal close-out that proves the day's takings and surfaces any discrepancy between counted and expected cash. How: tap X report to read the live snapshot, or Close (Z) at end of day and enter the counted cash. Both reports can be printed.
What it affects: closing a shift returns the register to the “no open shift” state — issuing is blocked again until you open the next shift.
Where issued documents go
What it is — each receipt or invoice you issue is a normal financial document: it carries its number, totals and VAT analysis, and (where transmitted) its myDATA reference and authenticity QR. Why it matters — because POS issues real documents rather than a separate till tape, every sale automatically flows into the rest of Finance — it shows up in your document lists and contributes to your revenue and reporting with no extra step.
Every POS sale also becomes an order. Behind the scenes each checkout automatically creates a sales order already marked Completed, Paid, Delivered — so counter sales appear in the Orders list, roll into the customer's Account, and count toward profit, exactly like any other order. You don't do anything extra.
- Browse and manage what you've issued in Finance → Documents.
- See the tax-authority side of issuing in Greek e-invoicing.
- Return to the overview in Finance & Invoicing.
If the catalogue shows no items, it means no products or services currently have a price set for the register. Add prices to your products or services first — you can still punch a free amount on the keypad in the meantime.